Chapter 3: The Sealed Flame of Infinite Knowledge
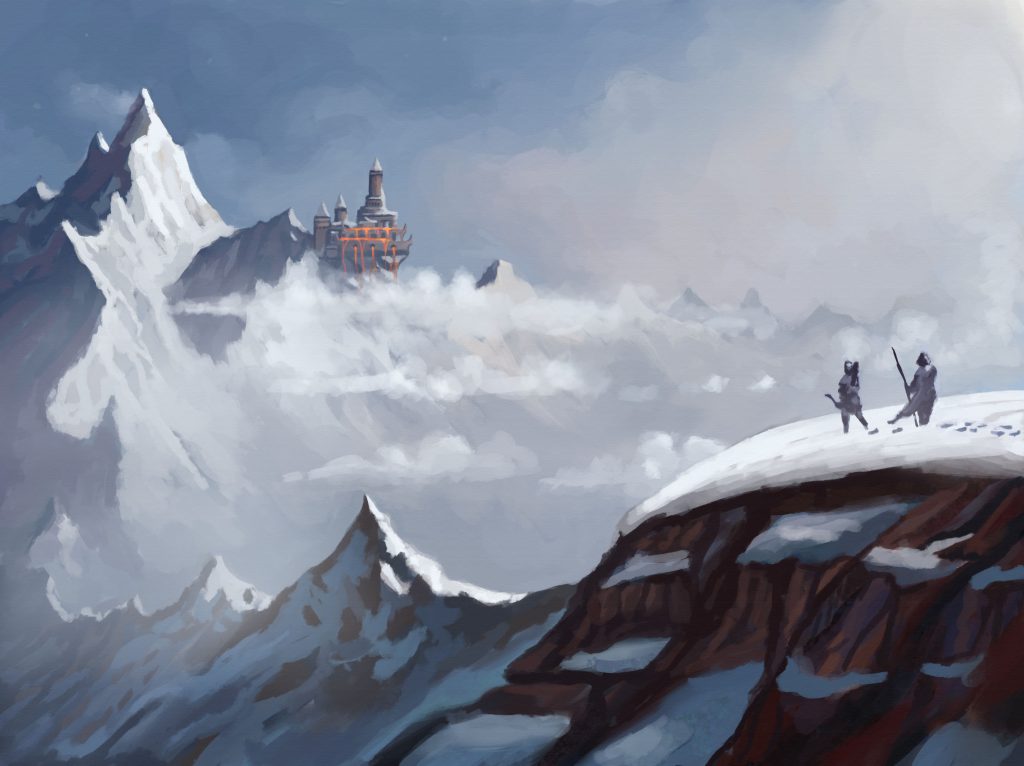
The Prometheus Temple, said to cradle the original Flame, stands as one of the last monuments to the Titan’s defiance. No songs are sung here, no prayers offered—only the wind and the shifting shadows remain as witnesses to its ancient power. It is here, within this forsaken ruin, that the Flame still burns, undimmed by time, holding within it the sum of all knowledge known and unknown.
Legends tell that whoever gazes into its fiery core will be granted a single truth of their choosing. But few dare approach, for with knowledge comes a cost, and the flame is as merciless as it is wise.
Recap
After the party completes the oil lamp, it flickers to life—a pale, eerie glow casting long shadows upon their faces. In that trembling light, they see visions etched in fire, revealing the hidden path to Mount Haimos, where Prometheus’ Temple stood shrouded in ancient sorrow. Demeter’s Wellspring, a place where the earth itself wept for forgotten gods, beckoned them toward their final trial.
Locations
The Wellspring of Demeter’s Sorrow
With the loss of her daughter Persephone during the Dark Honeymoon, Demeter fell into a profound grief, an agony so deep that it poisoned the very earth she once cherished. Her sorrow was an abyss, and from it emanated a bitter cold that swept across the Wellspring, freezing everything in its path.
It is whispered among the old tales that in her unbearable anguish, Demeter froze time itself within her territory, unintentionally condemning all its inhabitants to an unending moment of despair.
After the Dark Honeymoon, the Wellspring remains afflicted by a never-ending winter, its architecture and residents transformed accordingly. It now boasts temples and monasteries of crystal ice, and beautiful gardens of underworld flowers that grow near the cold Cocytus River.
Summary
Act I – The Journey trough Ice
The party travels to the Wellspring of Demeter, and faces multiple challenges, like Yetis, avalanches, dangerous climbs and much more.
Act II – Inside the Temple
The party uses the oil lamp to open the doors and explores inside. Here they can discover more of the history of the temple, find multiple treasures and prepare for the fight to come.
Act III – The Last Fight
Here they face Erebus and the Cult of the Ever Night. There will be a final fight to decide who gets access to the flame.
Possible Enemies:
Act 1 Monsters:
Act 2 Monsters:
- Blood Cursed Werewolf
- Corpse Incinerator
- Veteran Cultists
- Giant Skeleton
- Skeleton Warriors
- Haunted Tree
- Mold Person
- Banneret
- Soldier
- Elite Soldier
- Elite Shield Bearer
Act 3 Monsters:
Content Download
Here you can find the downloadable content:
Act 1 - The Journey trough Ice
Description: Arriving the Frozen Lands
As you move forward, the dense forest around you begins to thin. The tall trees give way to the creeping chill of frost.
At first, the change is slight—the rich green leaves now edged with frost, the air turning sharper and colder. Soon, the rustling of branches fades, replaced by a heavy silence. The ground beneath your feet hardens, covered in a thick layer of snow, and the vibrant colors of the forest disappear into a white, icy expanse.
What was once a lively woodland is now a barren, frozen wasteland. Jagged ice and deep drifts of snow stretch out endlessly before you, the warmth of life replaced by the cold grip of Demeter’s sorrow.
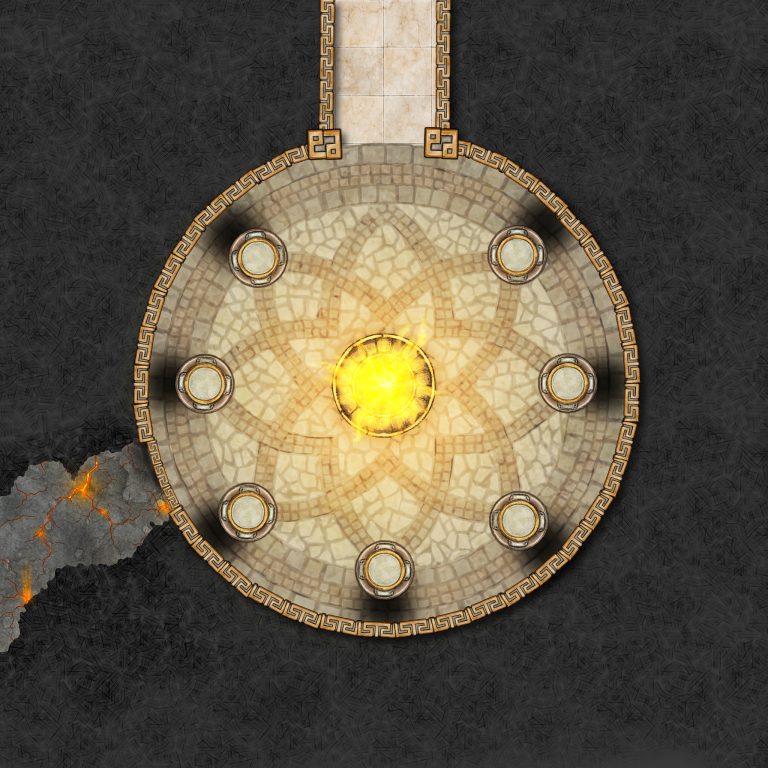
Scene 1: The Yeti Ambush
After a couple of weeks of travel the party is now surrounded by snow as they follow the guidance of the magic oil lamp. However, as they cross a snowy mountain, a Yeti prepares an ambush for them.
Any character with Passive Perception of 16 can notice the ambush. Otherwise, the party can roll 1 Perception Check (DC 16) to notice the ambush ahead.
- Combat: Use one Yeti (Tier 3) for the combat. If the combined Challenge Points are not enough to match party’ combined levels, you can add some Wolves (Tier 1) as well. If the party didn’t notice the ambush, the enemies gains 1 Surprised round.
If they win, they find 1 Wolf Skull (Rare Accessory) with the defeated Yeti.
If the party runs away, they must make a Skill Challenge (4 successes before 3 failures) to escape the Yeti. The Challenge represents them hiding, navigating the arctic, and covering their tracks for example.
If they succeed, they Yeti loses track of them. If they lose, the Combat restarts.
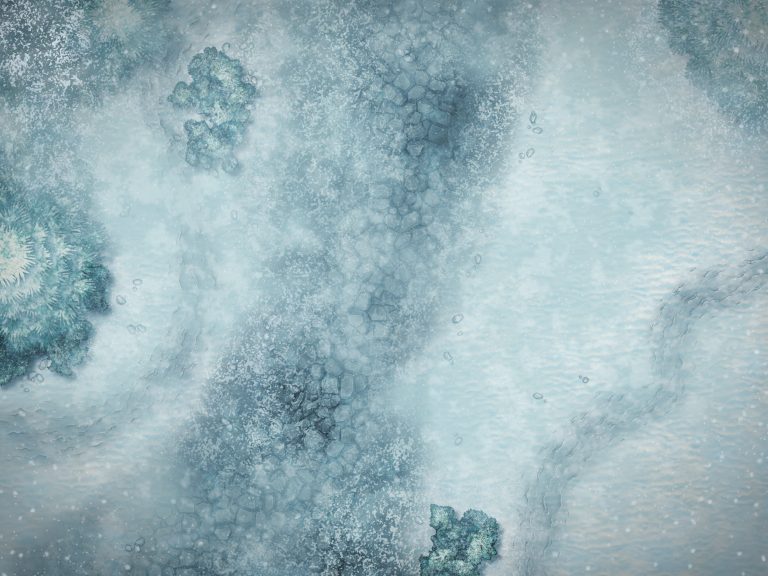
The Yeti Ambush Battlemap
Scene 2: Shadows of the Past
The Snowstorm
After the Yeti encounter, a terrible snowstorm is approaching. In order to survive, they must find refuge. Below are some places the party can try to rest; if they manage to find shelter there, they can take a Long Rest; if not, they must tread forward, only getting a Short Rest.
The Icy Caves
As the biting winds howl across the desolate tundra, the party seeks refuge in the frozen embrace of a jagged, icebound cave. As they step deeper into the cavern, the flicker of torchlight reveals a hulking figure nestled in the shadows – an owlbear mother with her youngling, their feathers rimed with frost, their breaths slow and steady in a deep slumber.
The party must make a Skill Challenge (3 successes before 3 failures) to leave the Owlbears in peace. The Challenge represents them moving quietly, calming or distracting the Owlbears for example.
If they succeed, they leave the Owlbears sleeping. If they lose, the Combat starts against a Raging Owlbear (Tier 3) and a Young Owlbear (Tier 2).
The party can find the remains of the Owlbear previous meal, a lost adventurer carrying some loot. They find a Amulet of Condensed Stored Mana (Rare Accessory) and a pair of Cozy Warm Shoes (Common Boots).
The Frozen Farm
The party arrives at what seems to be an abandoned farm, frozen and untouched for centuries. As they venture closer, they notice two frozen people, their faces locked in expressions of eternal sorrow. Between them, they grasp what appears to be a magical talisman, its faint glow flickering through the ice. The air grows colder still, as if the very land mourns the weight of whatever ancient magic binds them here, frozen in time.
If the party removes the talisman from the frozen figures, they will break free from their trance and attack the party. Use 2 High Ice Statues (Tier 3). While someone is holding the Talisman, they can see a glimpse of the farm in its verdant glory, teeming with life. The vibrant hues of green a stark contrast to the frozen wasteland, echoing the sorrow of what was lost.
If they win, they find 2 Frost Weapon (Rare Weapon) and 1 Talisman of Memory Preservation (Rare Accessory).
If the party runs away, the frozen figures will continue to chase them as long as they possess the talisman.
The Frozen Noble in Hot Waters
As the party nears Mount Haimos, they discover a hot waterfall fed by the ruins of Prometheus’ Temple. Beneath the scalding waters, a figure standing on top of a small Iceberg—rapidly melting—calls out for help. This Frozen One begs for salvation, as the heat threatens to dissolve him. To save him, the party must succeed in a Skill Challenge (3 successes before 3 failures). This Challenge represents them fending off weak elementals in the water, keeping the Frozen One cold, and getting him out of the hot waters for example.
If the party fails, he will melt away and die.
If they succeed, the Frozen One is saved. He will then reveal himself as Aurelius Dotrus, the Frost Noble, and say he was traveling and exploring ancient temples in the region. He will also share valuable lore about Prometheus Temple and the mountain. He will not accompany the party, since the Temple is warm and could easily melt him away.
Whether they succeed or fail, the party may rest in the hot waters having a Full Rest.
Act II - Inside the Temple
Description: The Temple
The Temple of Prometheus, perched atop the frozen peak of Mount Haimos, is a colossal ruin, its grandeur long faded beneath the weight of time and ice. Its vast, open courtyards stretch out beneath the sky, barren and desolate, once thriving with life but now hollow and silent. The towering stone walls, cracked and worn by centuries of howling winds, rise in layers, leading deeper into the heart of the temple.
Scattered across the walls are murals—stories painted by long-dead hands. But the years have stripped them of their color and meaning. The temple stands as a monument to something greater, a relic of power long diminished, yet its very emptiness holds an eerie majesty, as if it still remembers what the world has chosen to forget.
After the party takes their rest, they ascend the jagged slopes of Mount Haimos, the wind howling as the air grows thin. In the distance, the ancient Temple of Prometheus looms—its towering stone columns cracked and blackened by age, the entrance framed by molten rock that oozes down like tears of a forgotten god.
As they approach, a figure stands vigilant at the gate, pulsing malevolent energy, its fiery eyes locked onto the party, barring their path into the heart of the temple.
This figure will depend on the Flame corrupted by Erebus on the previous Chapter:
A Corpse Incinerator (Tier 3) if the Great Forge Temple of Hephaestus was corrupted.
A Giant Skeleton (Tier 3) if Poseidon’s Everbright Lighthouse was corrupted.
A Blood-Cursed Werewolf (Tier 3) if Artemis Hidden Moonflame Temple was corrupted.
Scene 1: The Entrance Combat
When the party arrives at the Entrance, run 1 Combat:
Blood-Cursed Werewolf Combat
Use one Blood-Cursed Werewolf (Tier 3) for the combat. If the combined Challenge Points are not enough to match party’ combined levels, you can add some Wolves (Tier 1) as well.
Giant Skeleton Combat
Use one Giant Skeleton (Tier 3) for the combat. If the combined Challenge Points are not enough to match party’ combined levels, you can add some Skeletons Warriors (Tier 1) as well.
Corpse Incinerator Combat
Use one Corpse Incinerator (Tier 3) for the combat. If the combined Challenge Points are not enough to match party’ combined levels, you can add some Veteran Cultists (Tier 2) as well.
If the Players Win
If they win this challenge, they can reach inside the Temple.
If the Players Lose
If the players flee or die, Erebus will be able to finish his ritual, corrupting the Temple. Read the passage at the Epilogue were Erebus wins.
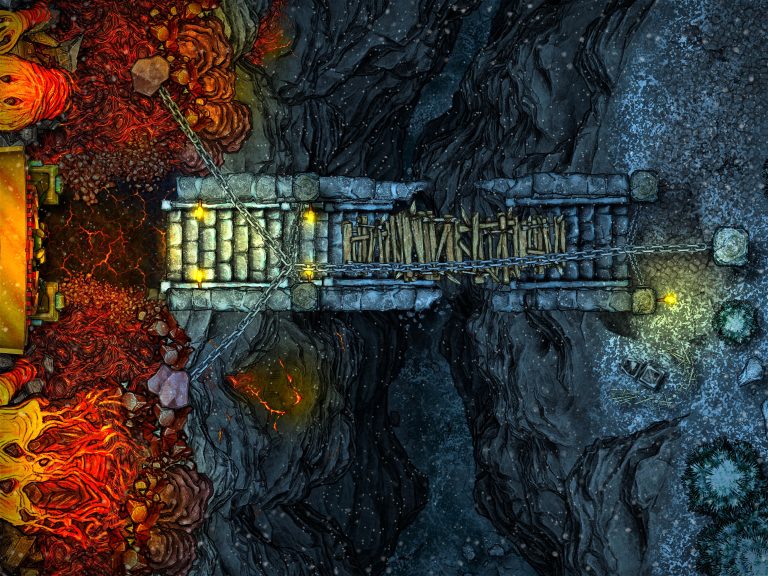
The Entrance Combat Battlemap
Scene 2: Inside the Temple
Description: The Inside
The inner sanctum of the Temple of Prometheus is cold and imposing. Tall stone pillars, covered in frost, rise above a floor of broken, worn tiles. Faint light seeps through cracks in the walls, casting shadows on tattered banners. An eerie silence hangs heavy in the air.
Faded murals along the walls depict ancient gods and titans, their stories barely visible, their colors drained. Crumbled statues lie in the corners, their features lost to time. Despite its decay, the room feels charged with an ancient power, as if something dangerous still lingers, watching from the shadows. As you step into the hall, the weight of history and the presence of something long-lost settles over you, a reminder that this place is not entirely abandoned.
The party can now explore the temple and find many hidden lore and treasures forgotten by time.
Here is a short list of the most relevant Temple Rooms they can explore:
Main Temple Rooms
- Challenge Hall (They Start Here)
- Garden
- Clay Room
- Guardian Room
- The Lab
- Library
- Secret Passage
- The Shrine of the Eternal Flame
Challenge Hall (They Start Here)
Upon reaching the entrance, the party notices multiple reliefs on the walls showing each titan brother giving a gift to the mortals. Atlas gave mortals resilience to bear the world’s weight. Epimetheus shaped their forms from clay, while Menoetius filled their hearts with passion. Finally, Prometheus, seeing their potential, gifted them fire intellect.
Upon advancing, the party is faced by multiple challenges, each representing one of the brothers:
Atlas
As the party advances, they come upon an imposing stone door, seemingly indestructible, with a detailed world map carved into its surface. To proceed, they must locate and pull a heavy chain, which briefly lifts the door for only a few seconds—just enough time for them to slip through before it crashes back down with a resounding thud.
For the GM: If someone tries to pull the chain alone, they must succeed on an Athletics check (DC 20). However, if the whole party pulls the chain together, they only need to make a Group Athletics check (DC 15) to open the door.
Epimetheus
The party arrives at another locked door, its only feature a single keyhole. In the center of the room stands a large block of clay, oddly still wet to the touch. Carved into the surrounding walls is a detailed relief depicting Epimetheus shaping mortals from clay.
For the GM: For this puzzle, all the party needs to do, is create a key using the clay. There is no need for any Checks. Use the GM discretion if they make something else. If they are having difficulties, point out the reliefs on the wall.
Menoetius
The party enters a chamber where carvings on the walls depict mortals experiencing the gift of Monetius: Emotions. At the center is an altar with a weak grey flame, surrounded by four statues representing some of these emotions: Rage, Love, Sorrow, and Joy. A locked door stands at the far end.
For the GM: To open the door, the party must reignite the flame by expressing each emotion:
- Rage: If a character strikes the Rage statue, the flame flares red.
- Love: If a character expresses loyalty or affection to the Love statue, the flame glows pink.
- Sorrow: If a character reflects on a past loss or tragedy before the Sorrow statue, the flame turns blue.
- Joy: The party must celebrate or express happiness near the Joy statue. The flame burns bright yellow.
Once all emotions are expressed, the flame glows in all four colors, and the door unlocks.
Prometheus
The party enters the final chamber, its walls adorned with a grand relief of Prometheus, his figure looming over scenes of fire and creation. The oil lamp the party is carrying flickers and the door ahead slowly creaks open on its own, responding to the presence of the lamp as if it holds the key to unlocking the way forward.
Garden
Description: The Dead Garden
Once a vibrant haven where people expressed their emotions through art, this place is now a haunting shadow of its former self. Broken instruments and scattered painting supplies litter the ground, abandoned and decayed.
Dead plants choke the space, their withered remains creeping across the forgotten garden. At its heart stands a lifeless tree, its twisted branches stretching skyward, a grim reminder of the beauty that once thrived here.
The party finds a garden in terrible conditions. If they investigate it further, a couple of undead plants attacks them.
- Combat: Use one Haunted Tree (Tier 3) and 2 Mold Persons (Tier 3) for the combat. If the combined Challenge Points are not enough to match party’ combined levels, you can add more Mold Persons (Tier 3) as well.
If they win, they find a Tuned Instrument (Common Miscellaneous), Putrid Gauntlets (Rare Gauntlets), Tree Staff (Rare Staff) on the undead plants bodies.
If the party runs away, they must succeed a Skill Challenge (3 successes before 3 failures) to escape. The Challenge represents them hiding, navigating the temple, and covering their tracks for example.
The Garden Battlemap
Clay Room
Description: The Clay Room
In the center of the room, an elevated platform holds an array of tools used for crafting with clay. Surrounding the platform are countless unfinished creations—half-formed clay warriors, incomplete vases, and statues frozen in mid-shape.
The air is thick with the lingering scent of wet clay, and the room feels eerily still, like a workshop suspended in time.
The party arrives at this room and can investigate the tools. With a successful Tools Manipulation Check (DC 15), they can create 1 Golem (Tier 2), which will help them for the rest of this adventure.
Guardian Room
Description: The Eternal Legion of Prometheus
This expansive room is filled with an army of clay warrior statues, ranging from charioteers to archers and spearmen. Each figure is equipped with ancient armor and weapons, forming a small but formidable force. They appear to stand watch over the chamber, their faces locked in silent vigilance.
As the party enters, they can see an unmistakable trace of Erebus’ dark magic. Even though a fight occurred here, there are no destroyed clay statues.
A lone banner stands in the center of the room, motionless, until the ground begins to ripple and shift. A soldier rises, gripping the banner in its hand.
As the banner is lifted high, the surrounding guardians awaken, their eyes glowing with purpose. Weapons are raised, and in unison, they assume battle stances, ready to defend the chamber against any who dare to intrude.
- Combat: Use 1 Banneret (Tier 3), 1 Elite Shield Bearer (Tier 3) and 1 Elite Soldier (Tier 3) for the combat. If the combined Challenge Points are not enough to match party’ combined levels, you can add more Soldier (Tier 1) as well. All of them are also considered Constructs, and gain the Golem Body ability (They are immune against Bleeding, Suffocated and Poisoned.)
The party can do a Skill Challenge (4 successes before 3 failures) in the middle of Combat to take the Banner from the Banneret. Disarming the Banneret counts as 2 successes. If they succeed in this Skill Challenge, the soldiers become motionless again and the combat is over.
To contribute to the Skill Challenge during combat, a character must spend 1 Action for the Use Environment/Object or use an appropriate ability or Spell.
If they win, they can take the Banner of the Eternal Legion (Very Rare Accessory).
If the party runs away, they must succeed a Skill Challenge (4 successes before 3 failures) to escape. The Challenge represents them fending off the soldier as they run away, navigating the temple and hiding for example.
Item: Banner of the Eternal Legion (Very Rare Accessory)
Special Effect: As an Action, you can summon 3 Soldiers (Tier 1) as clay warriors are formed from the ground, or any nearby clay or earth within 30 feet. You can command them as a Free Action, and they take their turns after you.
All of them are also considered Constructs, and gain the Golem Body ability (They are immune against Bleeding, Suffocated and Poisoned.)
They disappear after 1 day, or after you use this Action again.
The Guardian Room Battlemap
The Lab
Description: Strange Room
This room is a marvel of bronze and gold, a clockwork masterpiece filled with intricate mechanisms and mysterious devices. The walls hum faintly with the sound of turning gears, and scattered across numerous tables are peculiar instruments and the remnants of old studies, hinting at the minds that once worked here.
The room feels like a forgotten workshop of genius, where invention once thrived, but now lies dormant in dust.
The party arrives at this room, and can find many things. Among the strange and fascinating objects are:
- An astrological clock, its gears broken and misaligned, a once intricate tool. With a successful Tools Manipulation Check (DC 15), they can cast False Turn (Level 3) once at any time, without using Mana.
- An elaborate astral map, displaying the alignment of countless spheres in a complex, ever-repeating pattern. With a successful Arcana Check (DC 20), a player can understand that each sphere is a plane of existence and the entire party recovers all of their Luck Points, as a cosmic fortune blesses them.
- A spherical device with nozzles sits on a pedestal, designed to spin as steam escapes—an ancient steam-powered mechanism. With a successful Tools Manipulation Check (DC 15), they can use the device as a Fog Bottle (Uncommon Miscellaneous)
- A menacing gauntlet fitted with mechanisms designed to spit fire, a deadly blend of invention and destruction. With a successful Tools Manipulation Check (DC 15), they can use the device as a Flame Spitting Gauntlets (Rare Gauntlet)
- The party finds many strange bottles glowing red. They find 6 Magical Healing Potions (Rare Potion)
Library
Description: Dust and Scrolls
This ancient library is lined with shelves overflowing with scrolls and stone tablets, each covered in the dust of ages. Soft magical light bathes the room, casting a warm glow over the forgotten knowledge. At the center, a grand display dominates the space, depicting the tale of mortal creation and the daring theft of the Eternal Flame. The air has faintly magic smell, as if the very stories within the walls still hold power.
Here is some Lore the party can find:
Lore of Mortal Creation
Before the Titanomachy, Prometheus and his brothers—Atlas, Epimetheus, and Menoetius—crafted mortals from the raw essence of the world. Atlas gave resilience, Epimetheus shaped their bodies from clay, and Menoetius filled their hearts with passion. Finally, Prometheus gifted them fire, the spark of intellect that would ignite civilization.
From these gifts, the mortal races were born: humans with their adaptability, orcs with their might, dwarves with their craftsmanship, and many others to enrich the world. However, Zeus, seeing mortals as unworthy of such power, stripped them of their fire, leaving them in darkness. Enraged, Prometheus defied Zeus, stealing the flame from Olympus and returning it to the mortals. For this act of defiance, Zeus condemned Prometheus to eternal torment, chaining him to a mountain where a relentless Phoenix would tear at his liver each night, his punishment unending.
Pandora’s Myth
Zeus’s vengeance extended beyond Prometheus to the mortals themselves. With Hephaestus’s help, he forged a new race: the Elves, the first one being Pandora. Each god gave her a gift, but Hermes bestowed the most dangerous—curiosity. Pandora then married Epimetheus and as a wedding gift, she was handed a box, never to be opened. Yet, driven by curiosity, she released its contents—war, plague, famine, and death—upon the world. Yet, from the box also came Hope, a fragile light that would help mortals endure, even in the face of the evils unleashed.
Many wondered why Hope was sealed within the cursed box—some saw it as a cruel jest, trapping mortals in endless despair, while others believed it was Zeus’s way of giving them the strength to overcome the evils and prove themselves worthy of the divine flame.
Secret Passage
For the GM: During the exploration of the temple, give hints that there might be secret passages. Some of them lead to the rooms described above, but one of them will lead to the final room, where the Eternal Flame resides.
They can find this final secret passage with a Group Investigation Check (DC 20). If they find it, they can go stealthy to the final room and have 1 Surprised round during the final fight against Erebus.
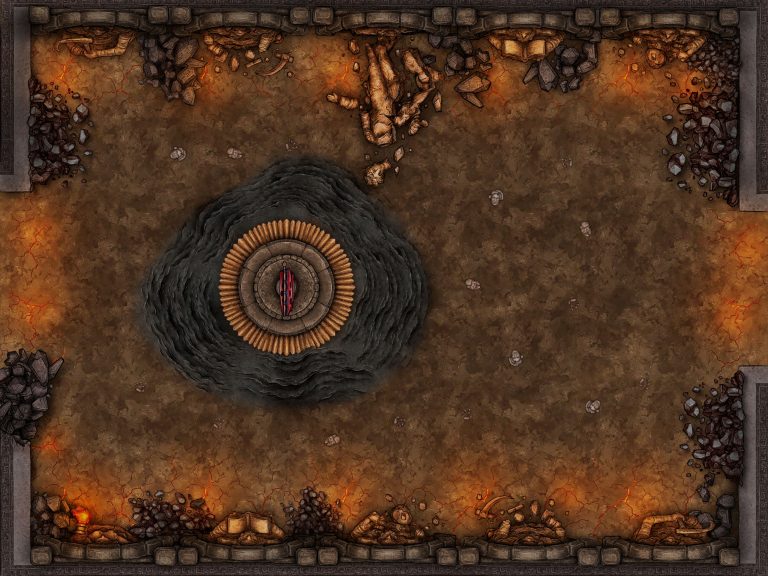
Act III - The Last Fight
Description: The Shrine of the Eternal Flame
The room, a grand circular hall of gleaming white and gold, centers around the Eternal Flame, burning bright amid towering pillars engraved with the story of Prometheus. Around the flame, a few identical figures of Erebus move in perfect unison, performing a vile and twisted ritual.
Among the many Erebus, one stands out. His tattoos glow with a bright purple light, shifting across his face and robes as if connected to a higher plane of existence. With each of their whispered chants, the color of the Eternal Flame shifts, its golden hue fading to a sickly, unnatural purple.
The stench of death lingers heavily in the air, as more bodies of Erebus lie scattered around the flame, sacrificed to their dark purpose. Their voices rise in a strange and alien mantra, invoking something older than the gods themselves—a primordial darkness.
If the party arrives through the Main Door, the lead Erebus will taunt them:
“I must say, I’m impressed you’ve come this far! But it’s too little, too late. Once I’m finished with you, the Eternal Flame will be no more, and Darkness shall take its place!”
If the party arrives through the secret passage, they will overhear some of the chanting and the lead Erebus speaking:
“Oh primordial one, we have lost so much, but we are so close to giving you everything! Our lives, the first spark, and Illiria itself shall be yours! Soon, we will all return to you and be whole once more!”
- Combat: Use one Blood Cultist Leader (Tier 3), 4 Blood Cultist (Tier 3) and Cultist Body Guard (Tier 2) for the combat. If the combined Challenge Points are not enough to match party’ combined levels, you can add more Blood Cultists (Tier 3) as well.
GM’ Note: Here some advice for the last combat:
Place the Cultist Body Guard (Tier 2) near the Blood Cultist Leader (Tier 3) for protection.
The Pillars in the room can serve as Heavy Cover for the party, but also for the Cultists.
Don’t forget that the Blood Cultist Leader (Tier 3) has Villain Magic, Command and Not Allow to Die!
If a character Shoves a Cultist into the flame, they take 2d6 fire and become Ignited (1d6).
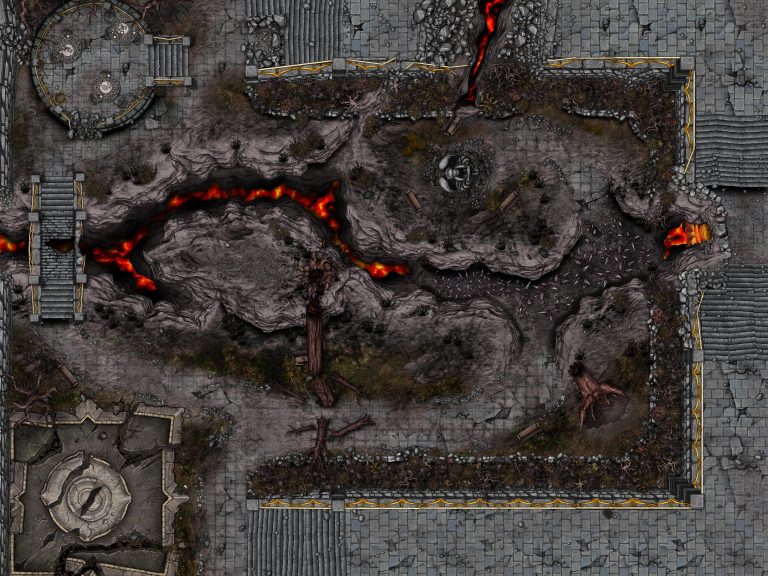
The Last Fight Battlemap
Epilogue
Erebus Wins
If Erebus prevails, the Eternal Flame will be extinguished, and complete Darkness will consume and annihilate the remaining Erebus.
Across every corner of the world, people will begin to forget, as divine knowledge slowly fades into a shroud of obscurity. The nights will stretch longer, and even the sun’s light will dim, its once vibrant glow reduced to a lifeless, desaturated hue.
Chaos will follow. Meaningless conflicts will erupt, and without the guiding flame of Prometheus, mortals seem destined to destroy themselves, caught in an inescapable spiral of ignorance and self-destruction.
Erebus Loses
If Erebus is defeated, the Eternal Flame will blaze with golden light once more, igniting the corpses of the fallen Erebus and purging them from existence.
In the days that follow, every spark of Prometheus across the world will burn brighter, drawing seekers of truth and knowledge toward its glow. Within months, places where the flame is housed will thrive, while those once destroyed or forgotten will begin to rebuild, flourishing under the renewed light of creation and intellect.
Echoes of the party achievement will spread. They will be known as the Warriors of the Flame, and their legend will inspire generations to come.
Final Rewards
- The Party gains 11 RP
- They have a safe haven on every place that resides the Eternal Flame
- The Flame blesses them, and they all gain +1 bonus to Intelligence or Wisdom stats and their max for those stats becomes +6.
- In the temple, there are many treasures. They can sell those to gain 1.000 gold coins in total.
- The party levels up
What Comes Next?
With the Ever Night Cult destroyed, the party is free to choose their next adventure. Players can start new characters in a fresh campaign, or you can create something new for the current characters. Here are some suggestions:
- The evils from Pandora’s Box react to the flames. It’s up to the party to find the pieces of the Box.
- The party can explore Thalassa’s Infinite Islands, provided they have a ship.
- The Emperor’s Wand and the Mystics react to the awakening of the flames, sparking conflict between them.
- The party is invited by the Torch, the Wolves, or the Dragon Hunters to take on difficult jobs.